What is OpenStack?
OpenStack is a private cloud infrastructure hosted for you and managed through the OpenStack software. Its remarkable growth positions it as a powerful platform for private cloud management in the cloud computing industry and the second-largest open-source project in history.
Due to its widespread adoption, OpenStack offers several deployment and utilization models, with various architectural designs, each having its own advantages and disadvantages. The software provides high configurability and customization capabilities.
In general, OpenStack is implemented using four different architectures:
- Single Node architecture using the traditional network model
- Two-Node architecture using the traditional network model
- Three-Node architecture with Neutron network infrastructure
- Four-Node architecture with Neutron network infrastructure
The One and Two-Node architectures are considered older, while the Three and Four-Node architectures offer significantly enhanced capabilities.
In summary, OpenStack is a collection of software tools and an open-source platform for deploying Infrastructure as a Service (IaaS) based on either a private or public cloud. It is a serious competitor to VMware vCloud, and many believe that the future of cloud computing lies with this product. Major entities like Intel, Wikipedia, and Paypal utilize OpenStack, managed by a non-profit organization called the OpenStack Foundation.
OpenStack's design draws inspiration from industry-leading cloud providers like Amazon Web Services (AWS), employing REST API programming interfaces to facilitate self-service and flexible IaaS infrastructure creation. Unlike other platforms, OpenStack integrates virtualization, networking, and storage functionalities without being tied to specific underlying infrastructure layers.
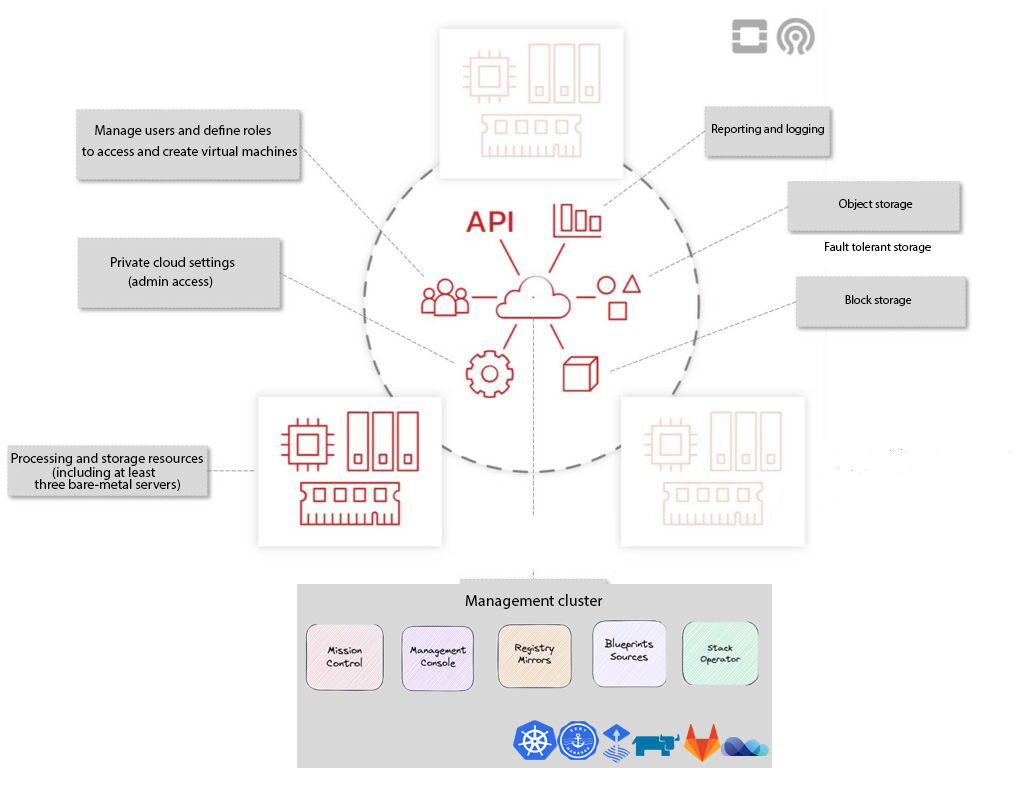
OpenStack software enables users to develop and manage virtual machines (VMs) and other instances, allowing for the control of various tasks in a running cloud environment. This software suite facilitates horizontal scalability, meaning tasks benefiting from concurrent execution can easily provide more or fewer services to users by adjusting different instance configurations during runtime.

The provided figure above offers a general overview of the structural organization and diverse services within the OpenStack framework.
Choose Wisely:
OpenStack has numerous advantages compared to other private cloud platforms, including simple REST APIs, an architecture resembling AWS services, and a powerful management platform integrating various virtualization, networking, and storage technologies. However, embarking on the use of OpenStack presents inevitable challenges.
Challenges:
Variable OpenStack Costs:
Installing and deploying OpenStack in a production environment is a challenging and costly process. Analysts estimate that deploying OpenStack on a 25-rack infrastructure requires around 20 engineers, with substantial time spent on research and architectural decisions. The actual cost of OpenStack installation is significantly higher than initially perceived for deploying open-source software.
Upgrade Challenges:
Upgrading from one version of OpenStack to another is a complex task often accompanied by sudden issues arising from unforeseen circumstances. Due to past upgrade difficulties, many organizations hesitate to migrate to the latest OpenStack version. User surveys, as briefly quoted, indicate concerns such as, "I feel problems like installing OpenStack at a large scale are still not easy... Migrating the entire infrastructure with a new version of OpenStack is challenging."
Out-of-the-Box Performance with OpenStack:
OpenStack is an open-source project, not a ready-to-use package that is seamlessly operational in your organization post-purchase. Direct installation from the source code makes setting up OpenStack a challenging task, requiring a specialized and experienced workforce or outsourcing to an external organization. In fact, the latest survey conducted by the OpenStack Foundation revealed that "complexity in installation and performance" poses a significant challenge for many users.
The Best Solution for You:
Drawing on our years of experience in infrastructure maintenance and management, we've examined all architectures used globally for private clouds. By staying on the cutting edge of technology and conducting in-depth research on current IT infrastructure deployment methods in Iran, we've arrived at the optimal combination and architecture for realizing digitization in organizations.
Proposed Solution:
In this solution, the scarcity of specialized human resources in our country, coupled with remarkable cost reduction in deployment and maintenance, allows an organization to swiftly navigate the challenging entry into the realm of new technologies, focusing solely on its development and growth in higher layers.
This OpenStack installation model includes hardware provided by us, installed on-site, and equipped with a distribution of OpenStack deployed and supported by us, specifically designed for running on that hardware, ready for instant use from the moment of deployment. Your computing, networking, and storage infrastructure are installed on-site and ready for your use from the moment of deployment.
Major hardware vendors worldwide, such as Cisco, Stratodesk, and ZeroStack, have chosen this approach, offering services to a range of customers. In the model we propose, the freedom to act has been granted, allowing the responsible party to take charge of the life cycle and maintenance of the private cloud or entrust it to us or external teams in a secure environment. Some of the key advantages of this model include:
Short deployment time for private cloud in the organization.
A significant reduction in operational risk, backed by an integrated platform for managing and maintaining the private cloud.
Provision of optimized, tested, and benchmarked software.
High integration capability with existing resources and infrastructure architecture currently active in the organization.
Independence from specific hardware and brands without the need for licenses and complete scalability.
100% freedom to deploy resources and human resources for managing and maintaining the private cloud.
Freedom from any restrictions and sanctions.
In this model, in addition to simplifying and intelligently streamlining the complex processes of infrastructure deployment and maintenance, attention has been given to ensuring that your investment in digitization has fully paid off, allowing you to utilize all existing resources in a new plan and system.
Overview:
In this document, you will learn how to manage your private cloud service through the web dashboard. The private cloud service, deployed by an integrated cloud platform, is ready to use. Whether you are a system administrator or a regular user, you can begin utilizing the service immediately.
As a system administrator, you have the authority to define projects and users using the private cloud web dashboard. Subsequently, as a regular user, you can take charge of defining security policies, configuring networks and routers, loading required OS images, creating virtual machines, and performing virtual machine backups.
The private cloud service at your disposal is created by deploying the powerful OpenStack software. For comprehensive OpenStack documentation, please visit the official OpenStack website. This summary document includes only essential points, considering that OpenStack is deployed exclusively for you on your private cloud, providing you the freedom to leverage all the unique features of this service.
Components of the Private Cloud Service
Getting Started with Private Cloud Service
To start using the private cloud service, you need to log in to the OpenStack Horizon web dashboard, a browser-based control panel for OpenStack. Your administrator should provide you with login details. If you don't have these details, contact your OpenStack administrator.
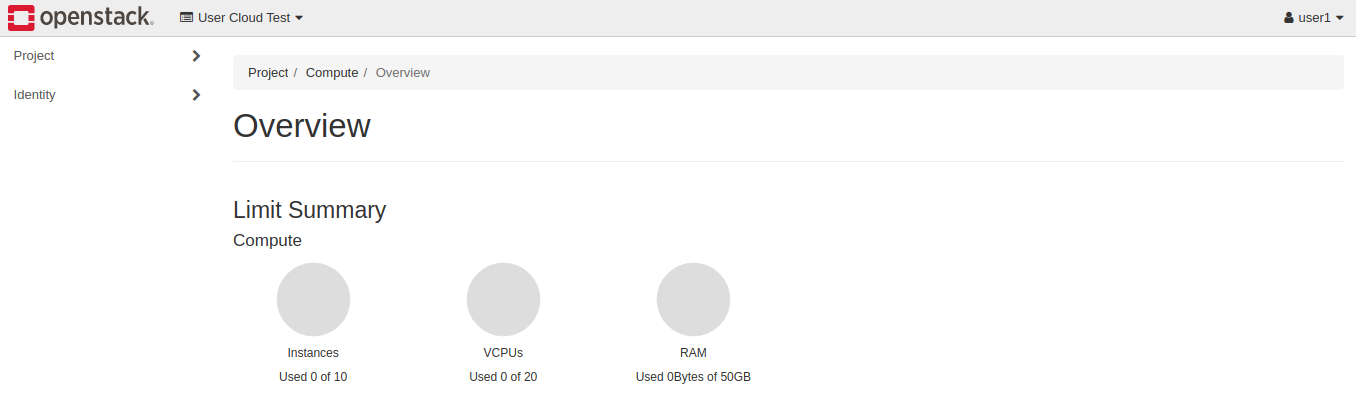
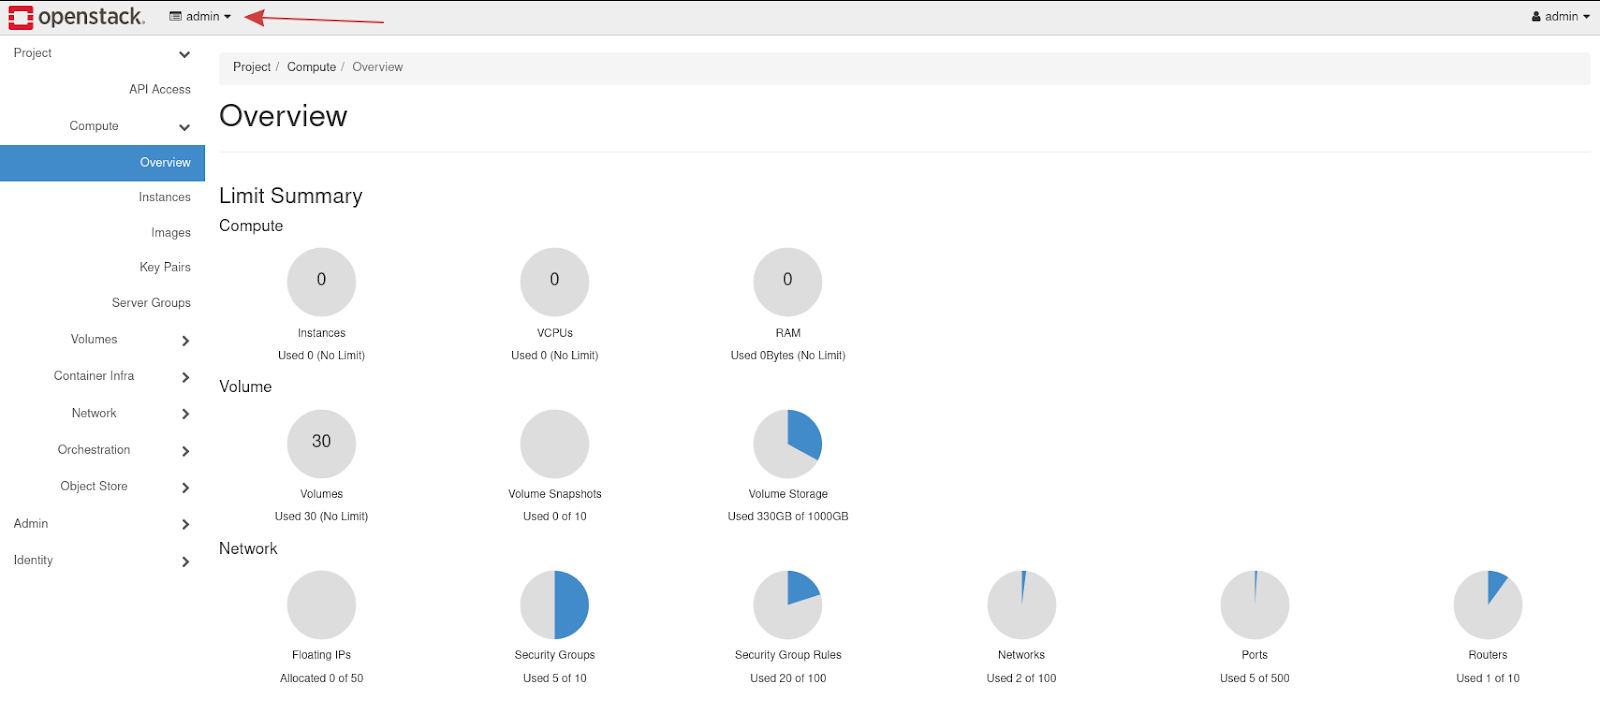
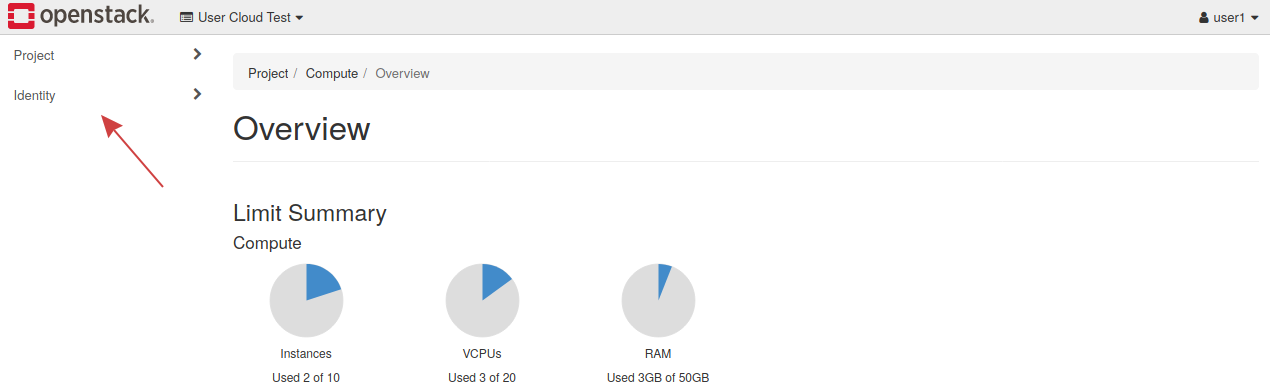
Once logged in, you'll see the main dashboard of your OpenStack project. Under the Project and Identity tabs in the left-side menu, you can access options for managing the private cloud and creating virtual machines. Additionally, you can view a summary of your cloud's status in the center of the page. Most of your actions will be performed under the Project tab, where you can launch virtual machines, create networks, and perform similar tasks. The Identity tab contains user-specific information, such as the user's associated projects and details about the user.
Logging into the Private Cloud Web Dashboard
In this section, we will review the process of logging into Horizon (the Private Cloud Web Dashboard).
Step 1 – Accessing Horizon
Enter the domain address for Horizon, provided by your administrator, into the browser to load the Horizon login page.
Horizon Login Page:
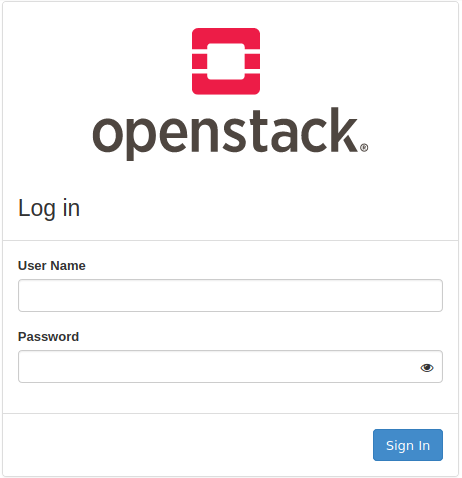
Step 2 – Logging into Horizon
From here, enter the provided login credentials to access Horizon.
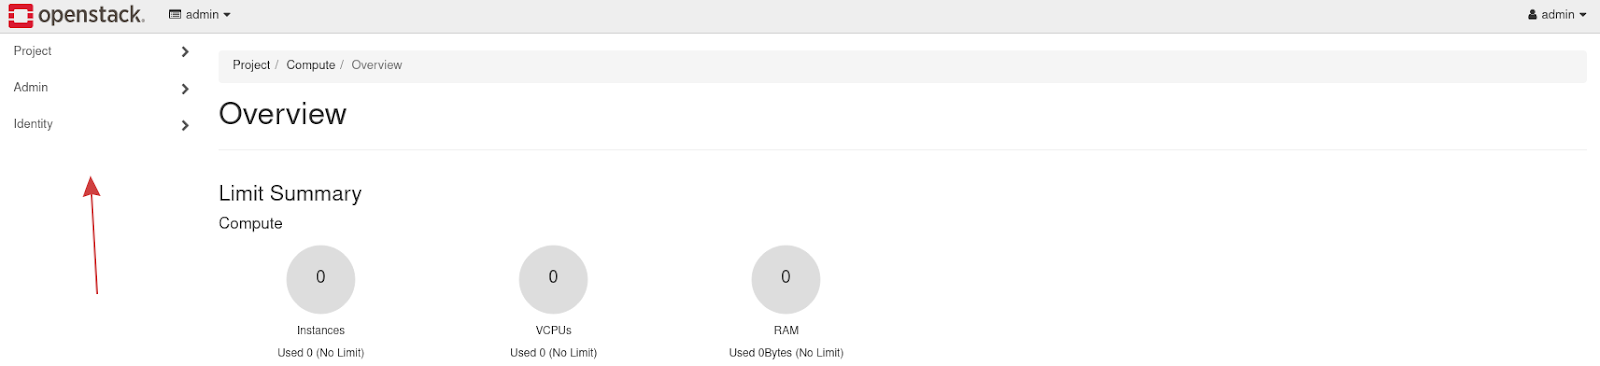
Horizon Initial Dashboard:
Creating Users and Projects in the Web Dashboard (OpenStack Horizon)
Important - This capability is only available to the primary private cloud user or a user with the role of administrator, and regular users do not have the ability to create projects or define users.
In your private cloud created with OpenStack, the cloud infrastructure is divided into projects. Projects include users with different access levels, defined by roles. An administrator restricts resources related to each project by adjusting quotas. In this guide, we explain how to create a project and associate a user with it. Additionally, we describe how to set project quotas.
Overview
After the initial login to the private cloud web dashboard, Horizon, as an administrator, you see tabs on the left side (main menu). The three main menus displayed are Project, Admin, and Identity. Only a user with the administrator role sees the Admin tab. Administrative operations, such as live migrating an instance, are performed through the Admin section. Project users with the member role only see the Project and Identity tabs and can only perform operations within their specific project.
How to Create a Project?
When you log in as the admin account to the private cloud web dashboard, you'll find yourself in a project named "admin." You can see this at the top left corner of the page.
The left column contains links to various sections where different tasks can be performed. There are three main groups: Project, Admin, and Identity. Only an account with the administrator role can see the Admin tab. The Identity tab is used to create a project.
Create the First Project
To create your first project, go to Identity -> Projects.
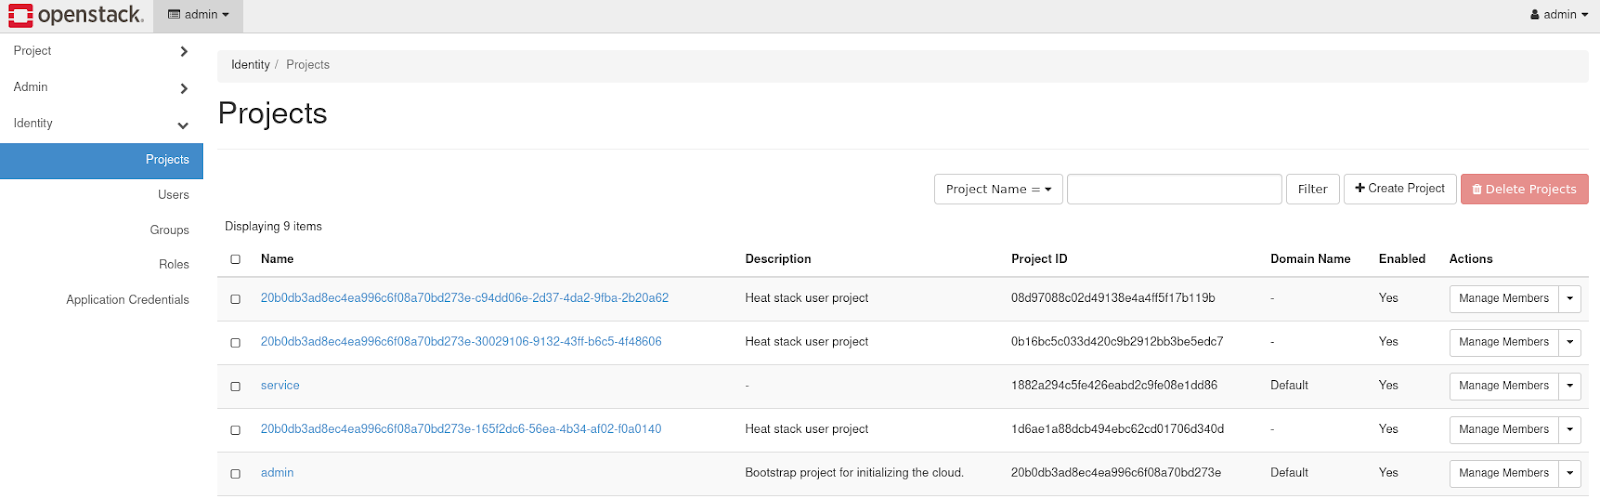
Several projects already exist, including the admin project. These projects are set up by default and generally should not be modified.
To create a new project, click on the Create Project button near the top right to open the project creation form.

In the Name field, specify a name for the project. In this example, the project is named "Development." There are tabs for adding project members and project groups, but these are not covered in this overview. The guide explains how to create a user and associate them with this project later. To complete the creation of the first project, click the Create Project button.
Once created, the project will appear on the list of projects.

Project Quotas
While on the project list page, as the admin user, you can view and adjust quotas for this project. Quotas are limitations on resources, such as the number of instances, for example.
To view the quotas for this project, go to the Identity -> Projects tab, and start with the drop-down menu on the right with the first option "Manage Members." From this menu, click on "Modify Quotas" to see the default quota values.

A form with several tabs will appear, and you'll encounter quotas for compute services. Quotas also exist for storage and network services.
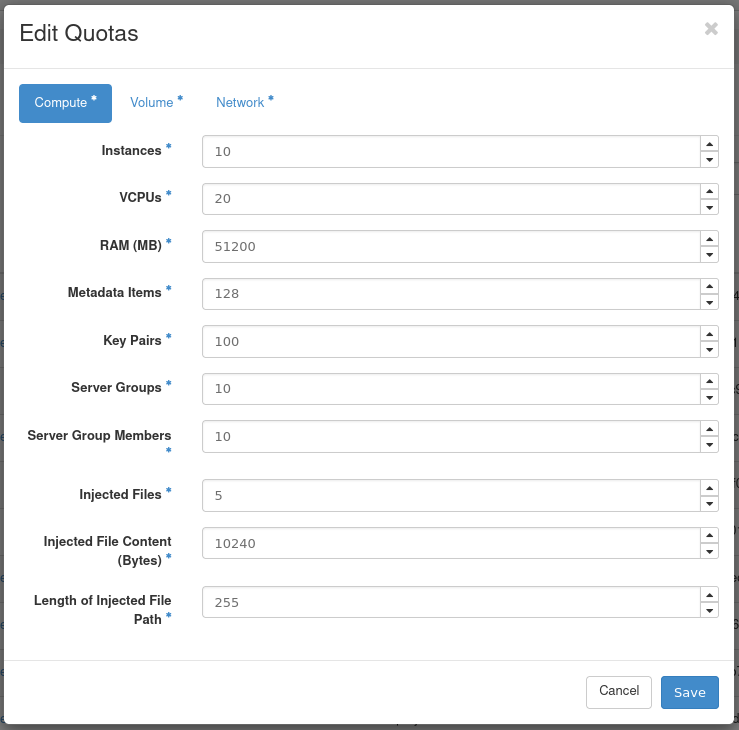
You may want to adjust the parameters in this form based on your workload.
Important! -- We have encountered issues where an item, such as an Instance, cannot be created. This is often due to a hard limit set for a specific quota. Usually, the error message received indicates that the quota has been reached.
Important! -- Setting the value to -1 means that the quota is infinite.
How to Create and Add a User to the Project?
After creating the first project, you can now create a user and associate them with the created project. This guide aims to help you create a user, link them to the created project, and then log in as the admin to check the new user.
To create a user, first go to Identity -> Users as an admin. By default, several users are already listed, and this is normal. These users were created during the deployment of the private cloud and generally should not be altered.
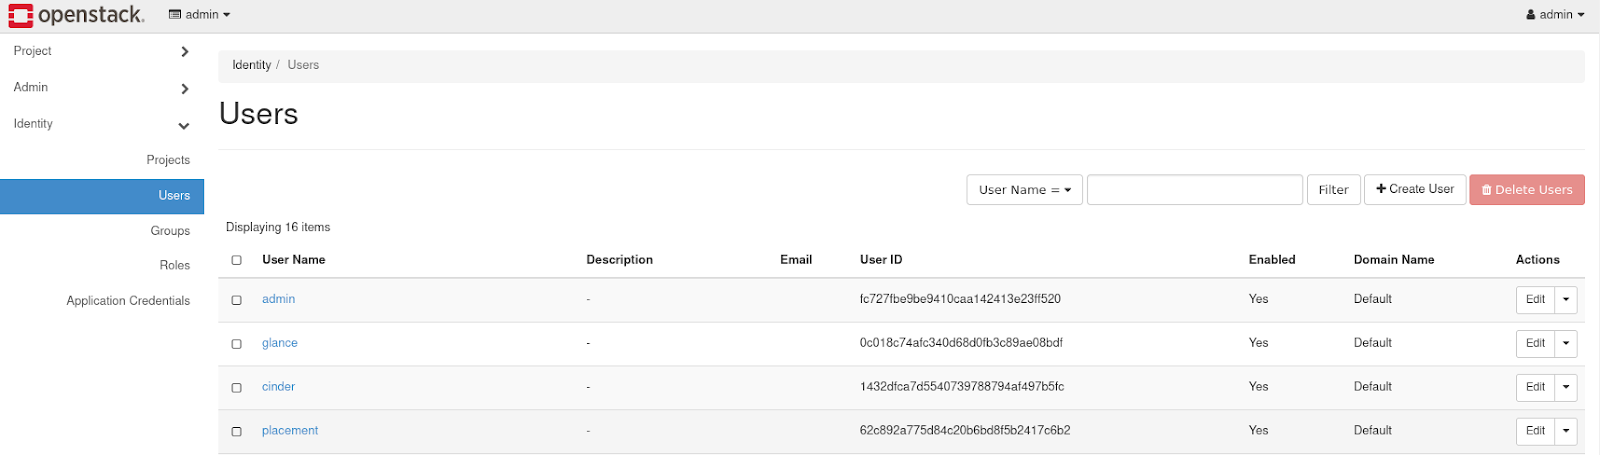
Next, navigate to "Create User" at the top right of the page to open the user creation form.
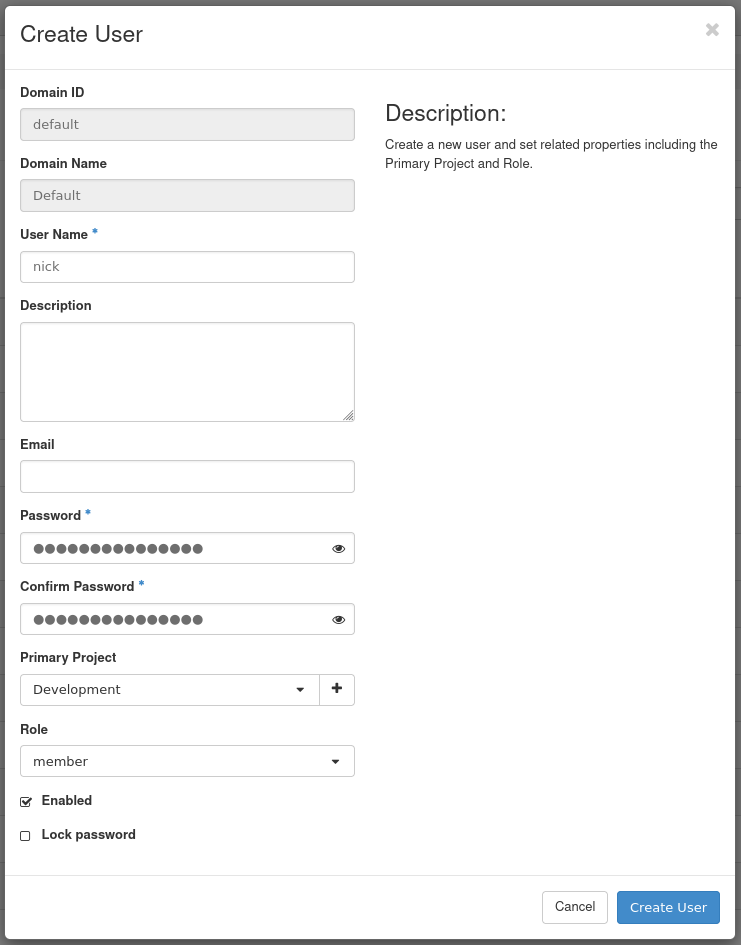
In this example, values for the username, password, primary project, and role are set:
- User Name: Specify your username here.
- Password: Set a unique and random password.
- Email: Optional but useful for password reset.
- Primary Project: Choose the project you created beforehand.
- Role: This example selects the member role for the user.
For the role, there are several options depending on the required level of access. Default OpenStack roles include reader, member, and admin. Additional roles are also available in the dropdown menu, as is common. This example assigns the member role to this user. For more information on roles in OpenStack, refer to the Keystone Default Roles documentation for the latest version.
To create the user, click on the "Create User" button.
Next, log out from Horizon as an admin and log in with the new user. After re-login, you'll be by default in the newly created project. You can see the project you are currently in at the top left and your user at the top right of the dashboard.

For the rest of this guide, it is assumed that you are using the newly created project and utilizing the associated user.
Network Configuration in Private Cloud
This guide explains how to create networks in OpenStack, including creating a private network, and a router, and allocating floating IPs through the private cloud web dashboard. To set up the initial network for any project, we need at least one internal network and one router. The external network is present by default (when creating a virtual machine, it must be connected to one of these internal networks). After setting up the internal network and router, we need to establish connections between the ports of the internal network and the router, ultimately achieving the desired topology.
You will learn how to create a private network where instances (virtual machines) will run. The network created in this guide will be used later when creating an instance.
Important: Use private networks whenever possible. Only expose parts of your cloud to a public network when necessary.
Neutron is the service responsible for network management in OpenStack. This service provides "network connectivity as a service" between interfaces and utilizes the OpenStack network API.
Neutron allows the creation of networks, routers, floating IPs, and security groups.
Creating a Network and Router
This section demonstrates how to create a private network and a router. The router is crucial as it allows you to establish routes between networks, such as connecting a private network to the internet.
Creating a Network
Step 1 – Getting Started
In Horizon, observe sections named Project and Identity. Components of an OpenStack cloud, including private networks, are created through the Project tab.
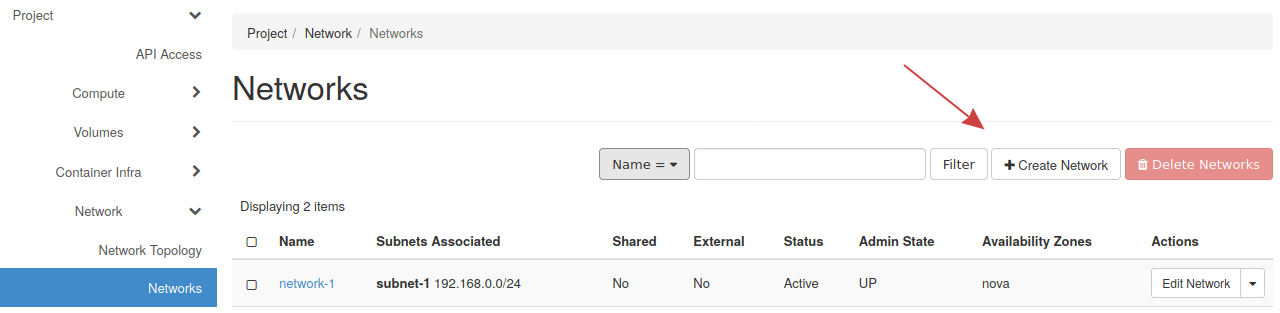
To create a network, under Project on the left, locate the Network section, then go to Networks. Finally, find the Create Network button near the top right.
Step 2 -- Create Network
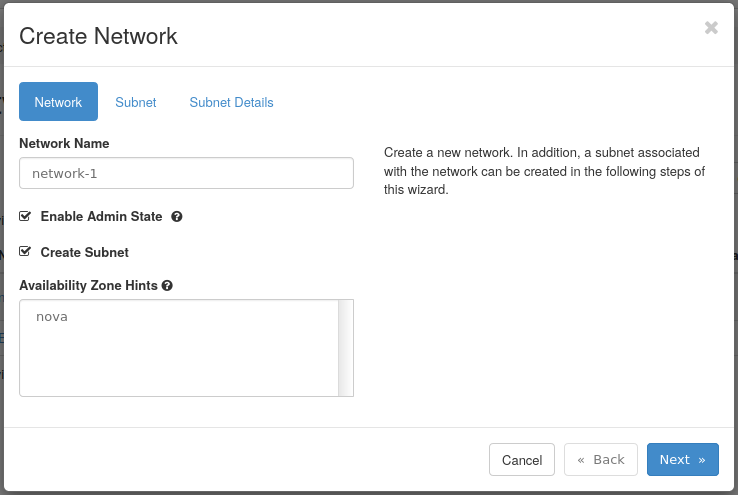
Network Name: This is the name of the network. In this example, it is named "network-1."
Enable Admin State: This enables the admin state, and the checkbox should remain checked.
Create Subnet: Check this box to create a subnet.
Availability Zone Hints: The default option is sufficient for this guide.
Provide any other necessary information and proceed to the Subnet tab.
Step 3 -- Create Subnet
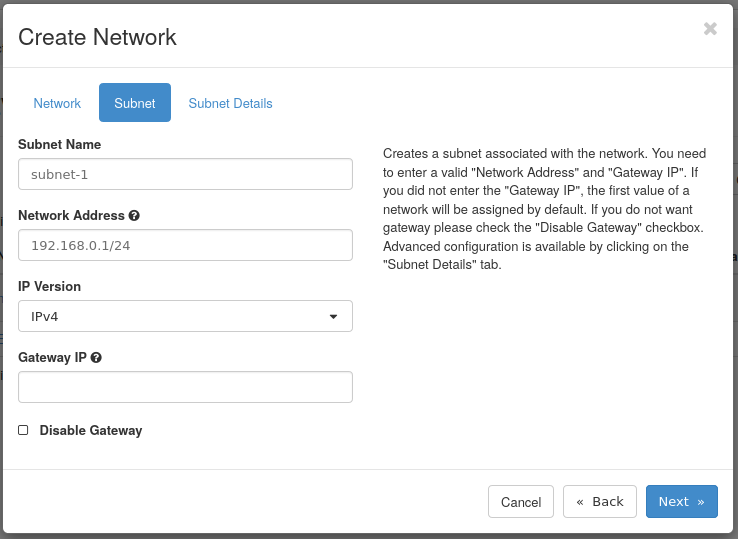
Subnet Name: Provide a name for the subnet; in this example, it is named "subnet-1."
Network Address: Choose a network using CIDR notation. In this example, 192.168.0.1/24 is used.
Gateway IP: Optionally, choose an IP gateway for this network. If the gateway IP is left blank, the Neutron service will make a selection.
The last tab is named Subnet Details. There is no need to fill in this tab to create the network and subnet. In this example, it will be left untouched. However, on this page, you can enable or disable DHCP, specify particular IPs for allocation, set DNS name servers, and configure host routes.
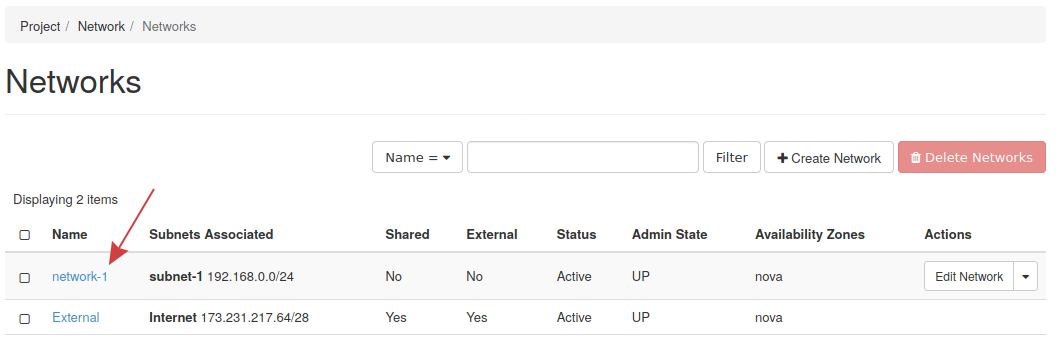
Step 4 -- Confirm Network Creation
By completing the previous steps, the network has been created. By opening the Network -> Networks tab, the new network is displayed.
Creating a Router
After creating a network, the next step is to create a router that establishes the connection from an external or provider network to the private network.
Step 1 -- Getting Started
To create a router in Horizon, navigate to the Project section, find the Network section, and go to Routers. This page displays the current routers' list and allows you to create a new router.
To create a new router, click on the Create Router button at the top of the list, on the right side.

Step 2 -- Creating a Router
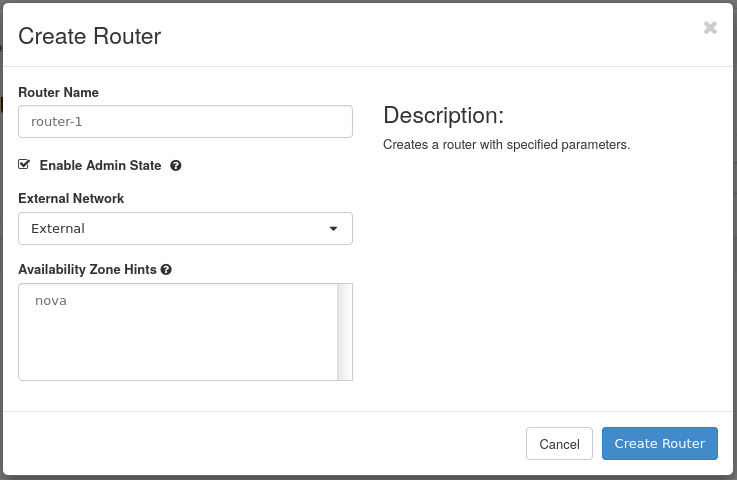
Router Name: Choose a name for the router. In this example, the router is named router-1.
Enable Admin State: Check the box to activate the router.
External Network: An external network will be utilized.
Availability Zone Hints: The default setting for this option is sufficient for this guide.
To connect the router to an external network, referred to as the provider network, the network named External will be used.
Step 3 -- Confirming Router Creation:
Once created, it will be displayed in the list of routers under Network -> Routers.

Step 4 -- Connecting the Router to the Private Network:
To allow the router to communicate with the external network and the network named network-1, network-1 must be connected to it. The connection of a router to a network is referred to as attaching an interface.
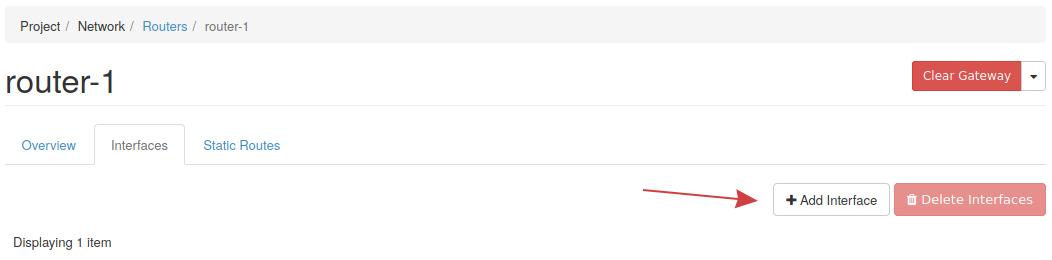
The first step is to bring up the newly created router from the Network -> Routers section in Horizon.
Next, to add an interface to this router, click on the router's name in the list of routers, then press the Add Interface button at the top right.
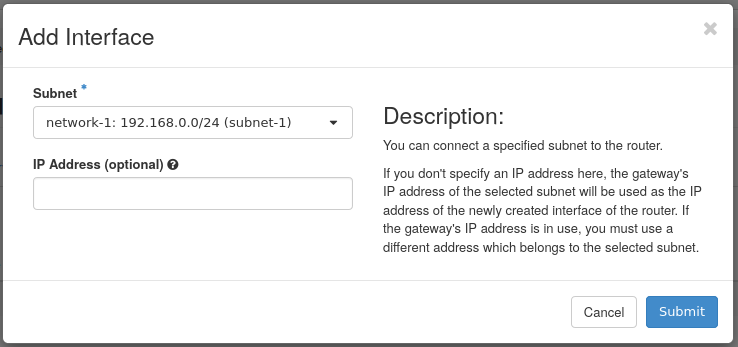
In the next step, select the subnet subnet-1 for the router to connect to, and optionally choose an IP address for the interface. If you don't choose an IP address, the subnet gateway IP address will be used.
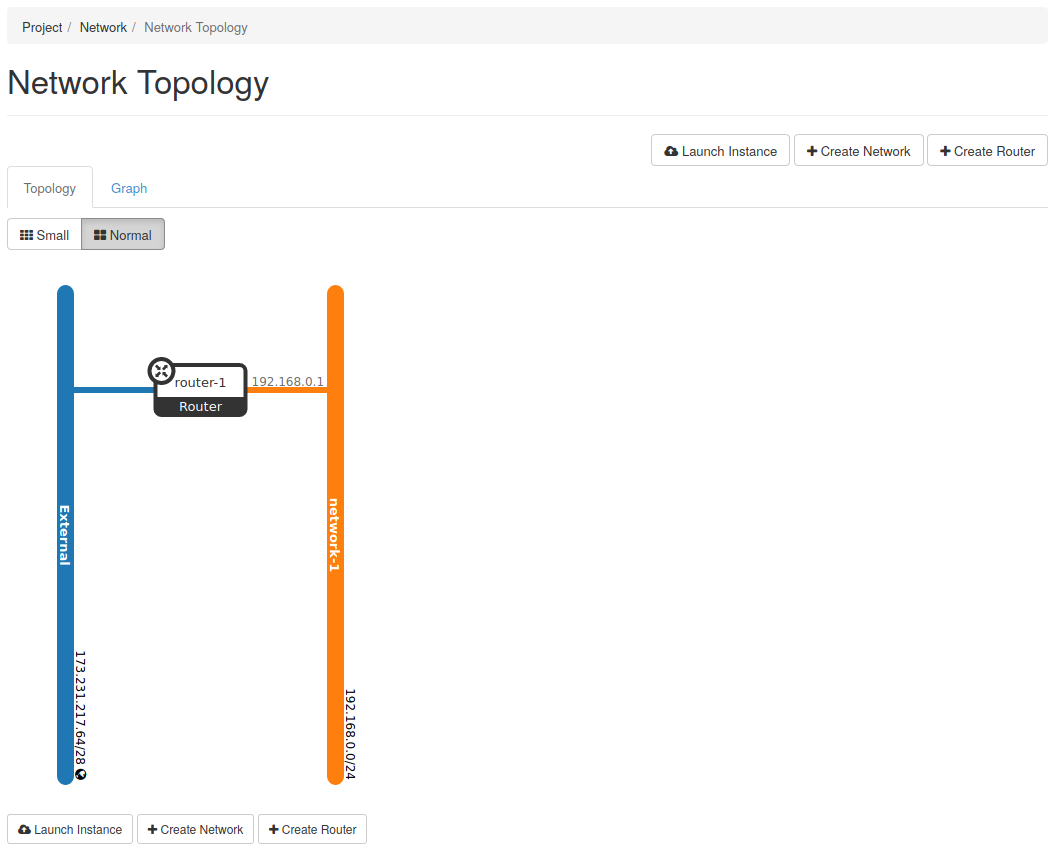
Step 5 -- Confirming Network Connections
With the addition of the interface to the router, the external networks and network-1 are now connected. You can verify this connection by going to the Network tab on the left, and then the Topology tab below it.
Floating IPs
Floating IPs in OpenStack are public and routable IP addresses that can be associated and dissociated with instances. For instance, if an instance is connected to a private network but needs internet access, you can associate a floating IP with that instance, enabling internet communication.
Allocating and Assigning Floating IPs
To use floating IPs, you must utilize the network provider's floating IP pool.
Allocating Floating IPs:
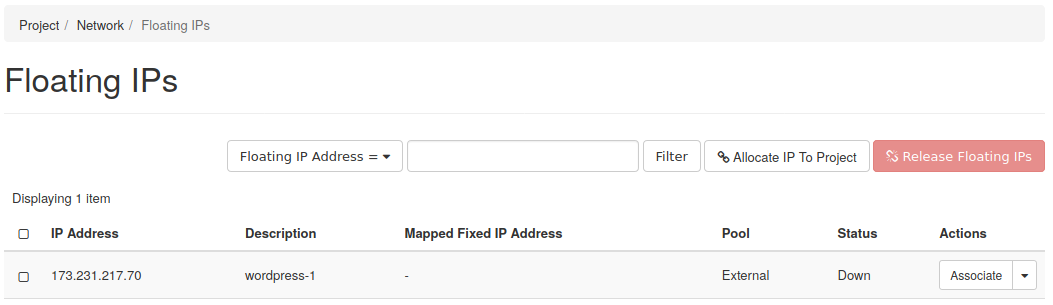
To allocate floating IPs in Horizon, go to the Network tab on the left and find Floating IPs.

Click on "Allocate IP To Project" to assign a new IP.
Then, fill in the required details in the IP Allocation form.
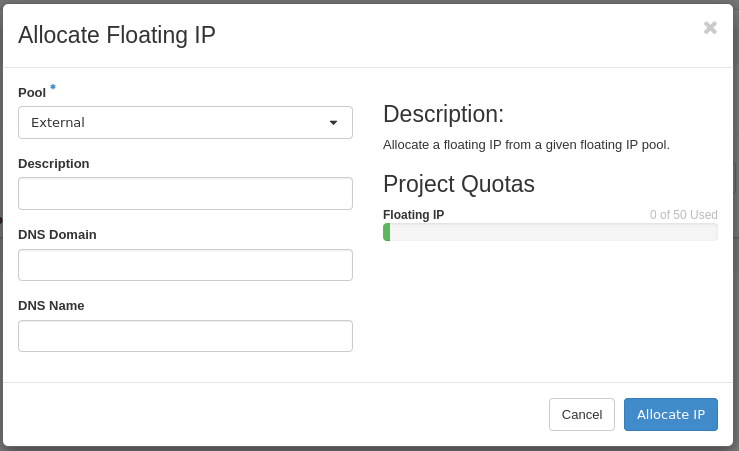
This IP is obtained from the external network provider. Here, only floating IPs are allocated.
Once the IP is added, you can see it in the list of IPs.
Working with Images
Images in OpenStack serve as the driving force for virtual machines (Instances). In this guide, you will learn how to view the list of images, upload your image, and take snapshots of images.
An image consists of a file containing a bootable operating system. Various cloud image resources are available for download from major operating system providers such as CentOS, Ubuntu, and Debian. You can also create your images from scratch or build them from volumes or running instances. Snapshots of virtual machines provide another method to create image files, serving as both a backup and a template for other virtual machines.
Viewing and Uploading Images
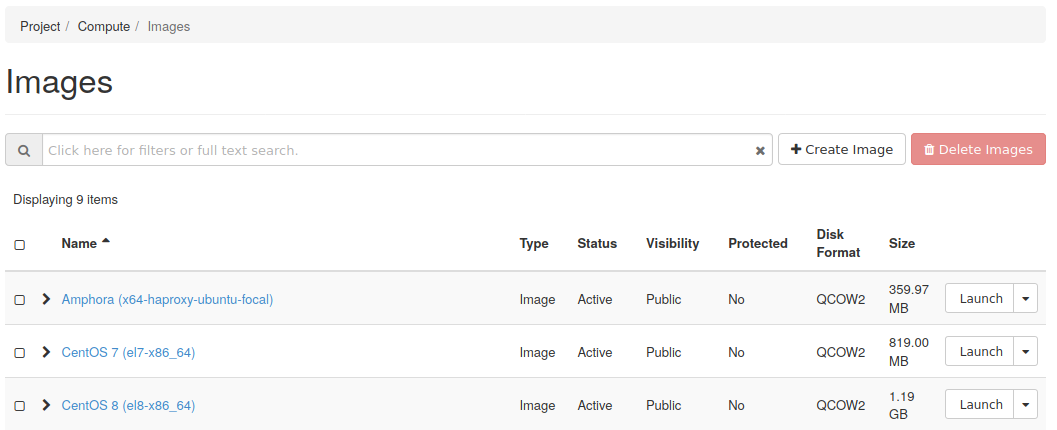
Viewing Image List:
To get started, you need to know how to find images in OpenStack. In the private cloud web dashboard Horizon, images are accessible on the left through Project -> Compute -> Images.
Uploading Images
To upload an image in OpenStack, the image must first exist on your device. Afterward, you can use Horizon (the web dashboard) to upload it.
Below are the steps for uploading a CirrOS image as an example.
Step 1 – Download CirrOS Image:
To start, download the CirrOS image.
The latest version of the CirrOS image is available on its download page. Make sure to download the latest version of the CirrOS image.
Step 2 – Upload Image to OpenStack:
To upload an image, go to Project -> Compute -> Images. Then, click the Create Image button.

Next, fill in the required details:
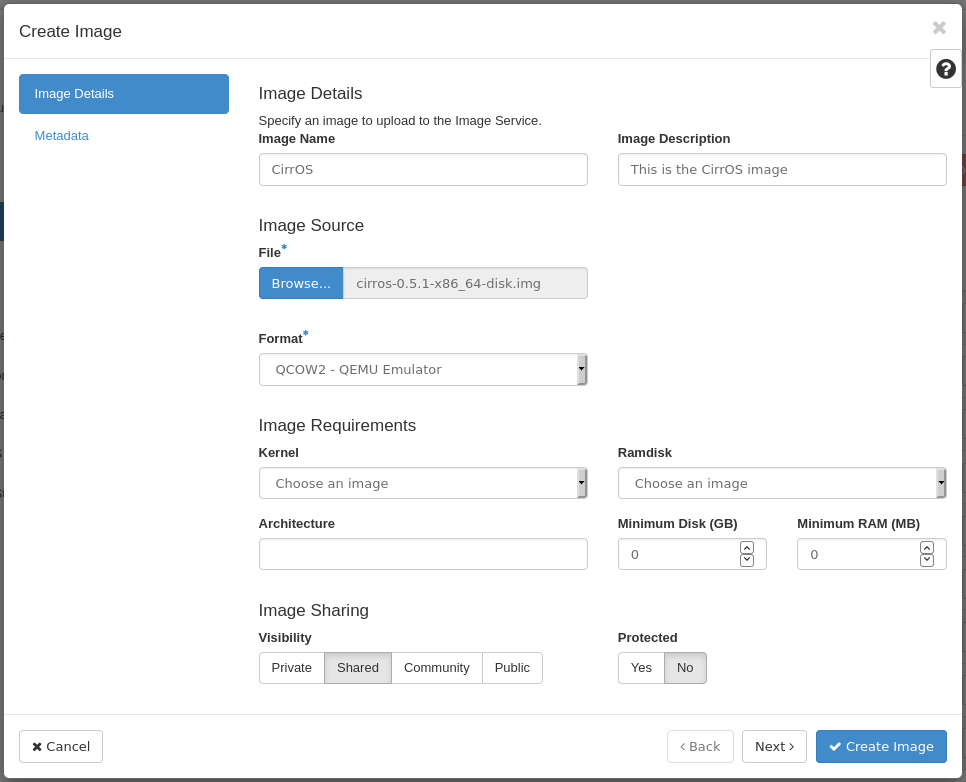
Image Name - This is the name you want to give to this image in OpenStack.
Image Description - This is an optional description for the image.
File - Where is the file located on your device?
Format - The format should be QCOW2 - QEMU Emulator.
Below the title Image Requirements, you can specify requirements such as minimum disk space and RAM for the image.
For guidance on details, click on the ? icon.
How to Create a Virtual Machine (Instance)?
Instances in OpenStack provide cloud computing capabilities. This guide demonstrates how to create an instance using the OpenStack web dashboard, known as Horizon.
You will also learn how to upload or create an SSH key pair, allocate storage using a Volume, and create a security group. Each of these components is essential in building an instance.
Before creating a virtual machine, you should know:
Before creating an instance, you must have configured and defined the following items in the dashboard. In general, these items need to be in place before creating an instance:
SSH Public Key: A part of an SSH key pair.
Security Group: Specifies network traffic rules.
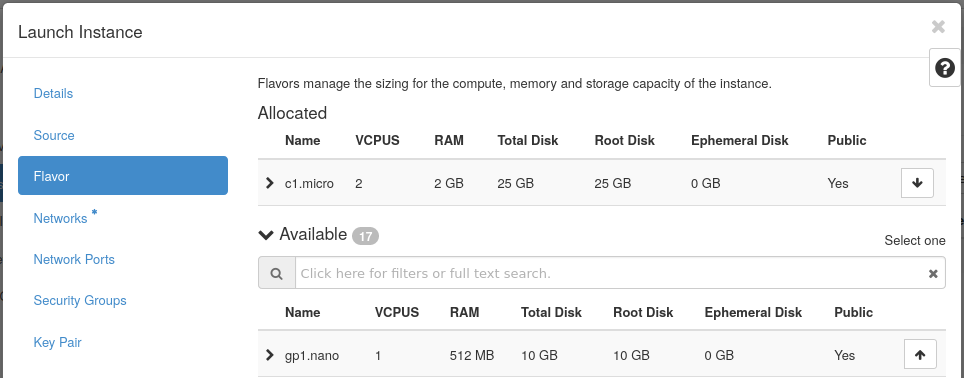
Flavor: Specifies resources like the number of vCPUs, RAM, and storage space.
Image: A bootable operating system.
Network: Usually, a private network.
SSH Key Pair:
To access any instance via SSH, an SSH key pair is necessary. Password authentication is disabled by default in operating system images.
You can create an SSH key pair or upload the public key from your own SSH key pair.
The following explains how to create an SSH key pair in OpenStack and how to upload your own SSH public key.
Creating SSH Key:
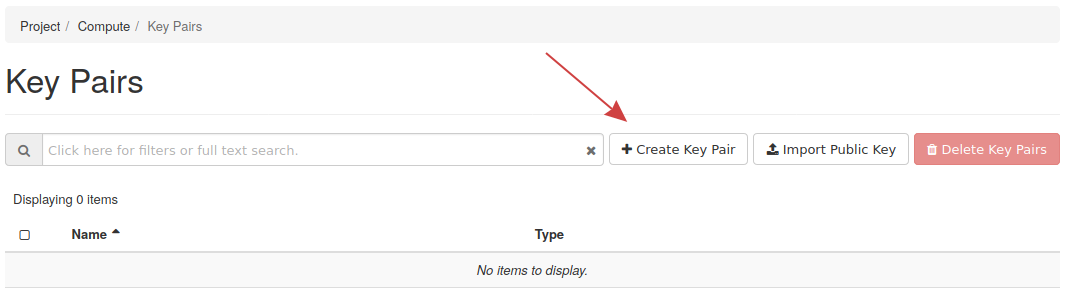
1- To create an SSH key pair, navigate to Project -> Compute -> Key Pairs in Horizon.
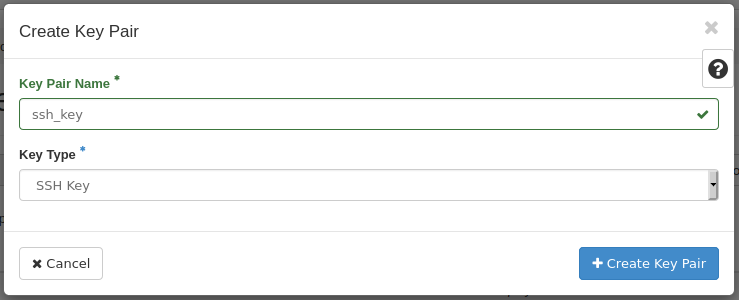
2- Next, click on the "Create Key Pair" option near the top-right corner.
3- In the next form, enter the key pair name and key type.
4- After completing these steps, you will be prompted to download the private key, which should be stored in a secure location.
Only you should have access to your private SSH key!
5- Now, the public part of the key is available in Horizon.
Uploading SSH Key:
If you already have an SSH key pair that you want to use instead of creating a new one, you can upload your public key. This can be done in the same Key Pairs section.
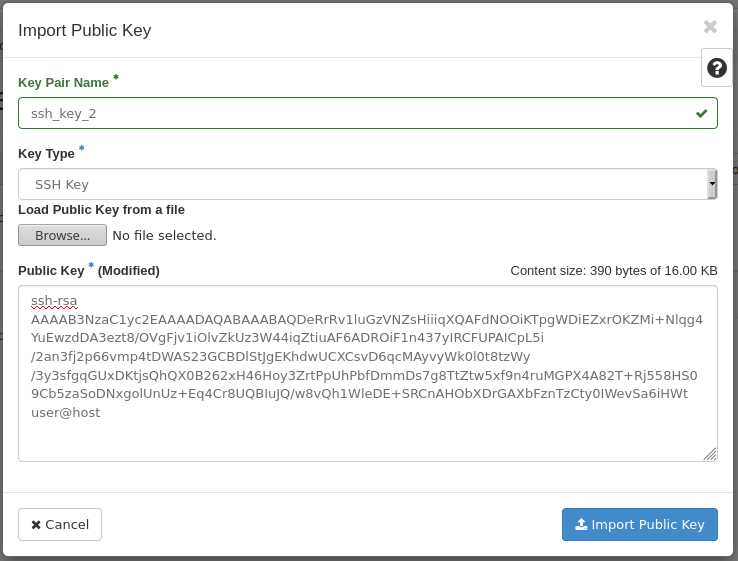
1- Find the "Import Key Pair" button at the top-right of the page.
2- Enter the key pair name, specify the key type, and finally, select or paste your public key from your computer.
Private Cloud Security Settings:
OpenStack provides the ability to apply individual security policies to each new instance, alongside security controls on the services available in the cloud computing system. These security policies are defined and applied to instances in the form of Security Groups. Given the significance of security issues in the network of targeted instances, the defined policies in Security Groups primarily control the access of instances to the network.
Here, for example, we will configure how to create a security group that allows SSH incoming traffic for a specific IP address.
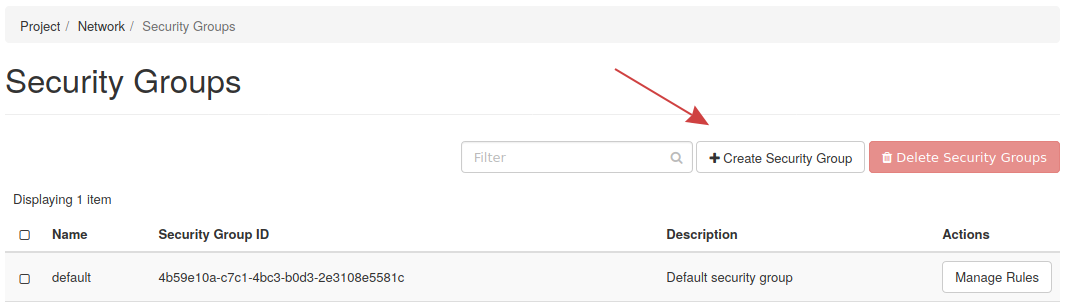
Step 1 - List of Security Groups:
To list security groups, go to Project -> Network -> Security Groups in Horizon on the left side.
Step 2 - Creating SSH Security Group:
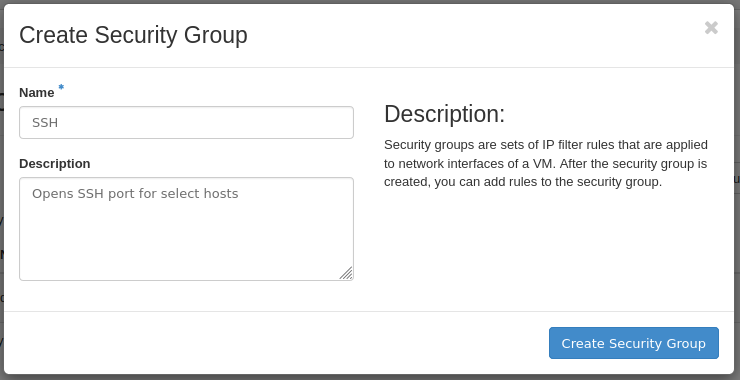
Enter the name and description of the group. After completing these steps, you will be directed to a page where you can define egress and ingress rules for the group.
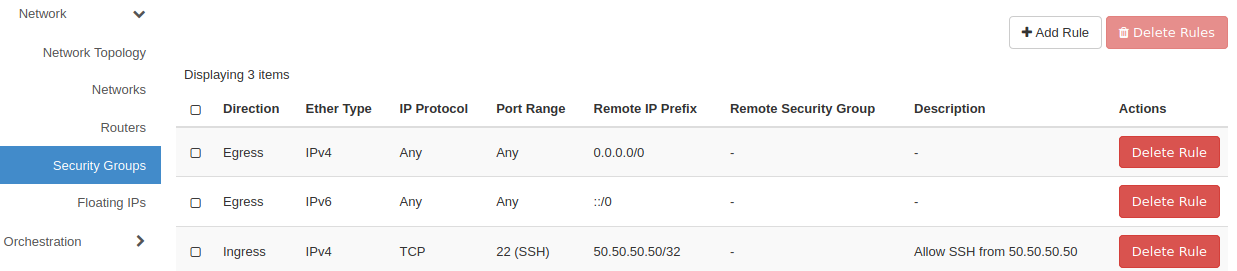
When a rule is created, OpenStack adds two egress rules that allow all outgoing traffic. You can see them as follows:

Step 3 - Adding SSH Ingress Rule:
To add an SSH rule, click on the "Add Rule" button at the top right, which loads this form:
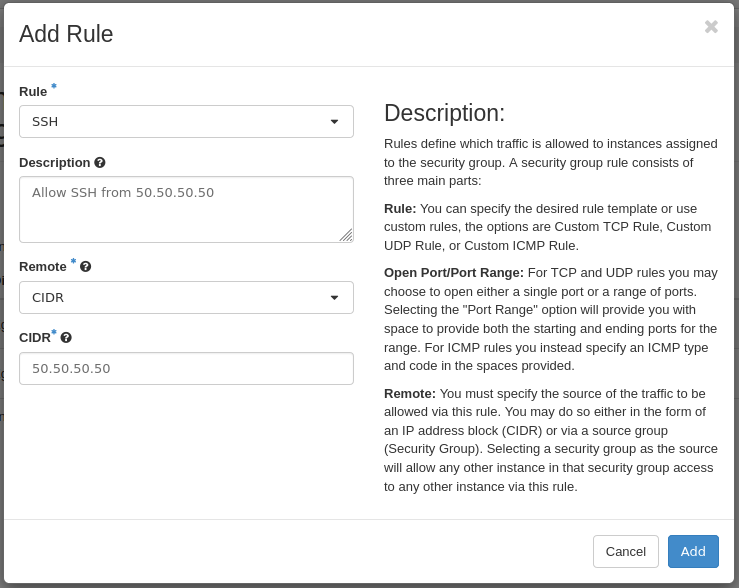
On this page, you can define a custom rule or choose from options already created for you, such as SSH or HTTPS. For this example, select the SSH option from the first field.
Important: You may notice that when selecting the SSH option, it allows all traffic. This is similar to opening port 22 for all SSH traffic, which may not be desirable.
To allow traffic for a specific host, add the allowed IP address for the SSH connection in the CIDR field. Similarly, if you need to allow traffic for an IP range, restrict it using the CIDR notation.
By adding a new rule, you will see it displayed as follows:
Adding Storage Space (Volume):
Instances can be allocated additional disk space through Volumes. In OpenStack, a Volume is akin to a detachable USB drive that can be attached to instances. Cinder is the OpenStack block storage service that enables the creation of Volumes. A Volume can also be used for booting an instance.
Here, for example, we explain how to create a 5-gigabyte sample Volume in Horizon. This is an optional step and only necessary if your instance requires additional storage space via a Volume.
Creating and Attaching a Volume:
Step 1 - List of Volumes:
In the dashboard, look on the left side and go to Project -> Volumes -> Volumes to open a page for managing and creating Volumes.
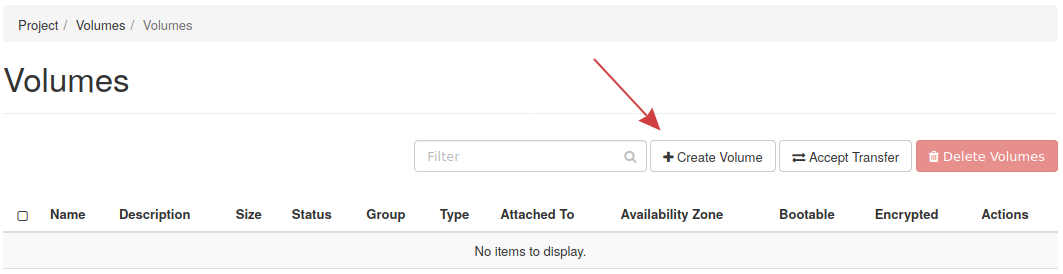
Step 2 - Creating a Volume:
To create a Volume, click on "Create Volume" and then fill in the details in the form.
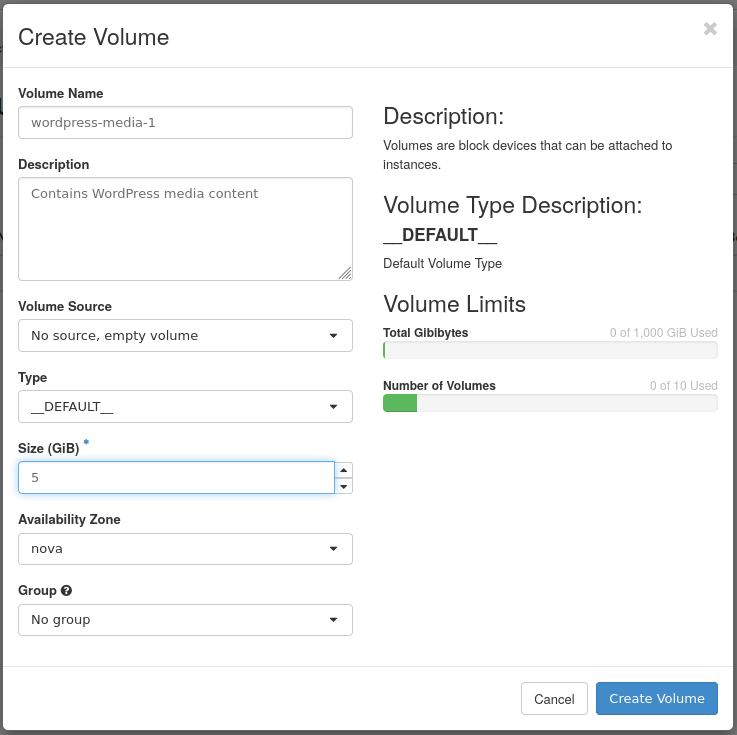
Specify a name and size for the Volume. Other options are not necessary for creating a Volume.
After creating the Volume, you will be returned to the Volume list page. If the Volume is ready for use, the "Status" column will show "Available."

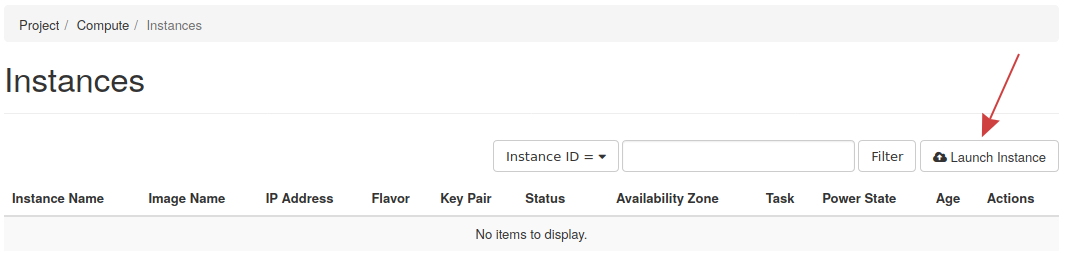
Creating a New Virtual Machine:
To create a virtual machine, after logging into the OpenStack dashboard, navigate to the Compute section under Instances. Click on "Launch Instance," and follow the steps in the opened window:
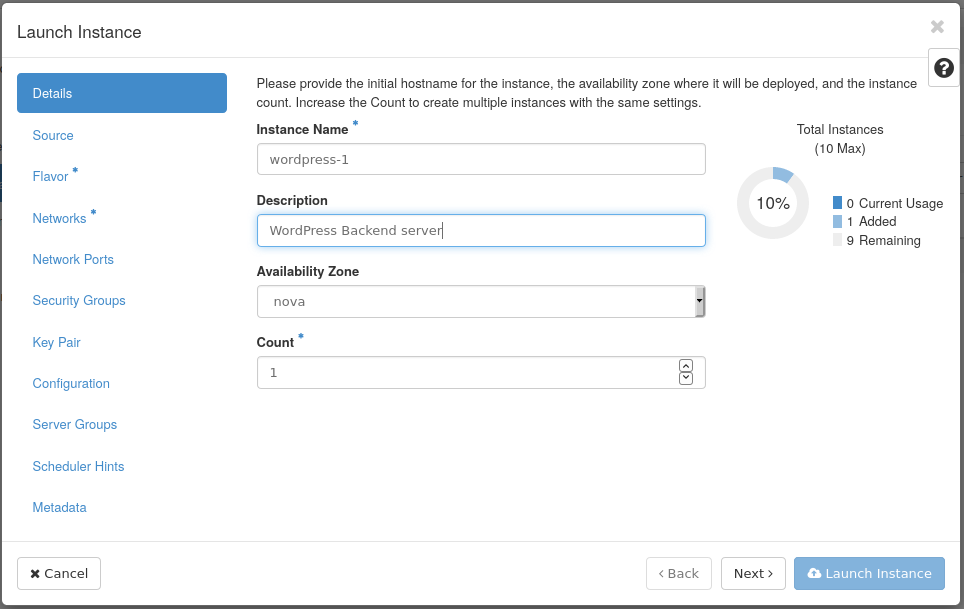
In the 'Details' tab, you specify the desired name for the instance in the 'Instance Name' field. In the 'Description' section, you can add any necessary notes.
If you wish to create more than one instance, you can set the desired quantity in the 'Instance Count' field. In this case, the specified number of instances with the defined characteristics will be created.
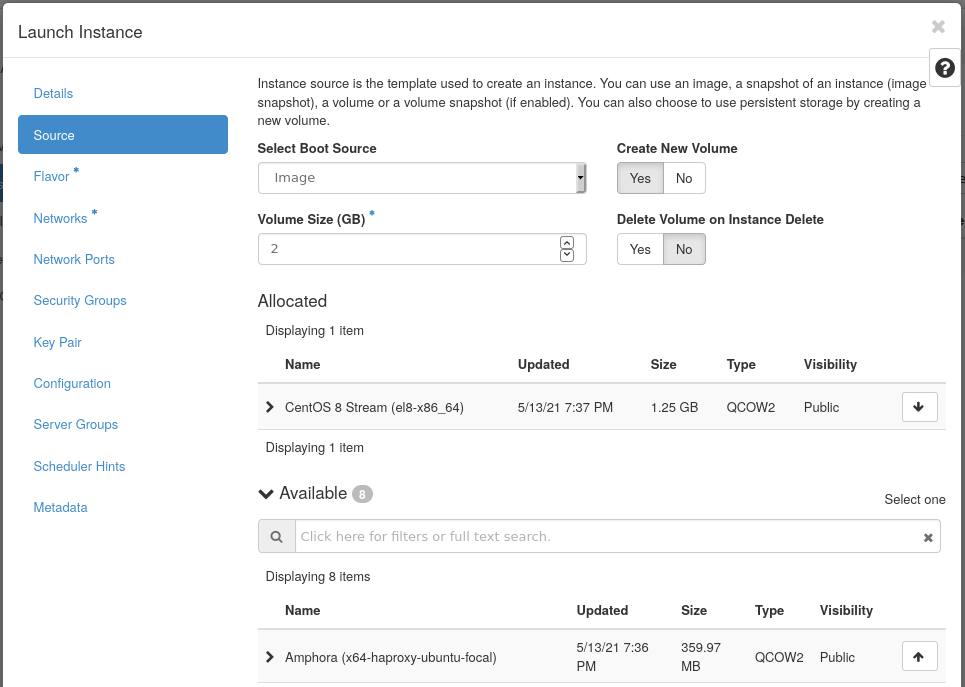
In the 'Source' tab, by default, you can specify that the instance boots from an existing image. Alternatively, you can choose the specific image for the instance by selecting it in the 'Image Name' section.
You also have the option to choose the disk size in the 'Volume Size' field, determining the amount of disk space for the instance.
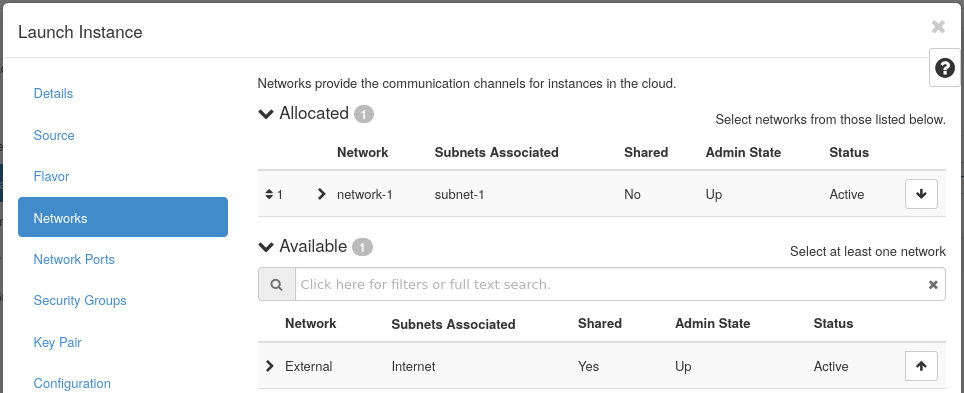
In the next 'Network' tab, you configure the network for an instance. To select a suitable network for a new instance, the desired network or internal networks must have been previously created (as mentioned at the beginning of the guide). Pre-existing internal networks are displayed in the 'Available Networks' section. Therefore, the network for instance should be chosen from these networks. To do so, simply click on the plus sign (+) next to the network name to select it.
If only one internal network has been created beforehand, that network will be automatically selected as the default for the instance, and the instance will be created without having to go to the 'Network' section. However, if more than one network is defined, the desired network must be selected in the 'Network' section when creating the instance. It's possible for a new instance to belong to more than one network.
Very Important - Configure all private cloud infrastructure IP addresses on the private network, and only open necessary components to the outside and the internet, such as the load balancer or the company website's front-end, which needs internet access.
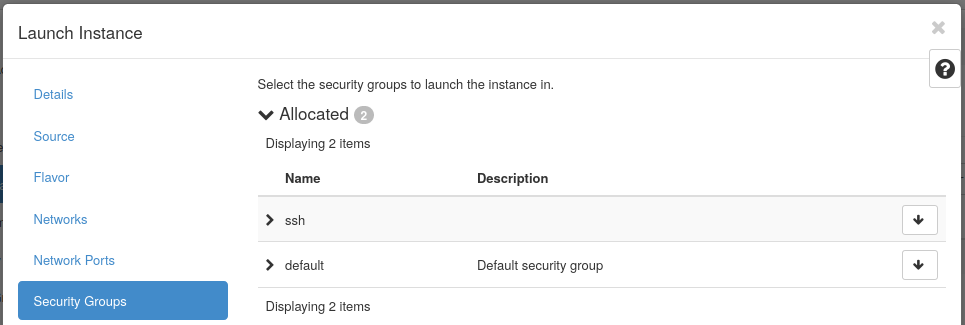
In the 'Security Group' tab, select the desired security policies for the instance from the list. In OpenStack, it is possible to define separate security policies for each instance. These policies typically focus on network usage within the instance. Before assigning security policies to a new instance, the desired policies must be predefined.
In the 'Security Group' tab, the list of defined security groups is displayed. Since more than one security group can be assigned to an instance, you can select the desired security groups by marking them. If you don't visit this section during the instance creation, the Default security policy will be assigned to the instance by default.
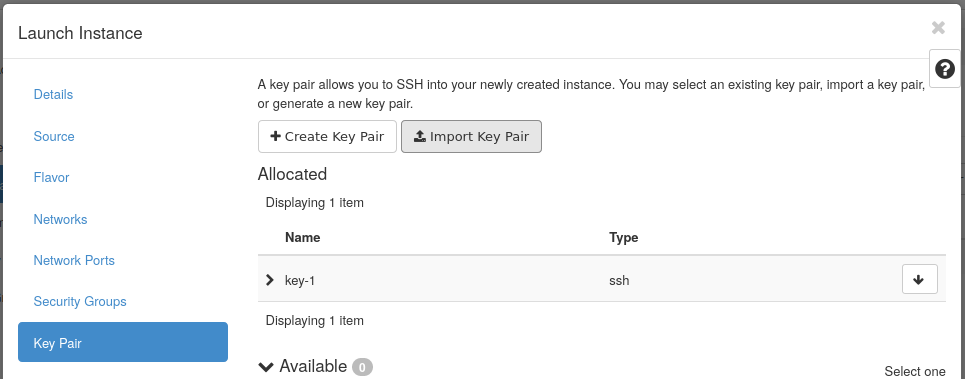
In the final and last tab, you need to add the public key of the instance. You can either choose it from your key list or upload it by creating a new Key Pair using the button above the Key Pair list.
The above steps cover all the necessary steps for creating a virtual machine in the private cloud. In the end, click on the "Launch Instance" button to queue the instance creation process.

Once the instance is created, its status will be displayed as "Active" in the list, and in the Power State column, you will see the status as "Running."

Accessing the Virtual Machine via SSH
After the instance becomes active, in the Actions column of the virtual machines list, you will have options for managing the machine.
As long as the instance is configured on the private network, the only way to access it is through SSH from the OpenStack hardware nodes, which may not be a convenient and straightforward access method.
To access the created instance via SSH, you need to assign a floating IP to it. To do this, open the dropdown menu in the Actions column and select the "Allocate Floating IP" option.

Assigning a floating IP allows you to access the instance over the internet. The default username for the instance is the same as the operating system name assigned to it.
Network access within the system is possible through the Private IP, and external access to the virtual machine is facilitated by a Valid IP, both of which are NATed with each other in a one-to-one correspondence. It's worth noting that both the Private IP and Valid IP can be viewed on the Instances page in the corresponding virtual machine row.
To access the virtual machine remotely via SSH/RDP or through the console provided by the cloud computing management panel, go to the Actions column. In the Compute > Instances section, clicking on the virtual machine's name will provide access to the menu shown below (Console can also be selected in the Actions section).
Backup in Private Cloud on OpenStack
Having a strong backup strategy is important in situations where data is lost, and recovery is needed. In this guide, you will learn how to back up Instance data, Volumes, and how to store backups outside the OpenStack cloud.
Attention to Testing and Backup Recovery Plan
Backups should not only be created but also verified to include all data and be part of a carefully planned recovery strategy. Consider a recovery scenario from damage that has never been tested. Make sure that your backups are likely to be usable, considering their specific situation. Always ensure the completeness of backup files, have a recovery plan in place, and, of course, adhere to the 3-2-1 backup rule in the most ideal scenario.
Backing Up Virtual Machines
This section reviews backing up an Instance using the OpenStack web dashboard. Creating a comprehensive backup of a virtual machine in cloud services is called a Snapshot.
Step 1 – Creating an Instance Backup
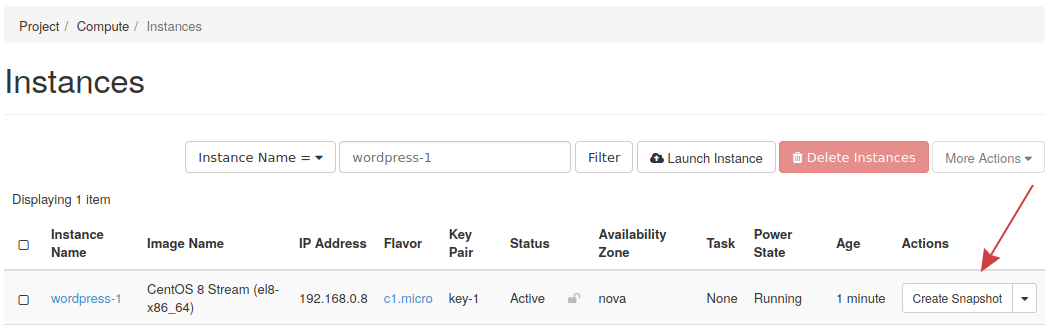
To create a backup of an Instance, go to Project -> Compute -> Instances.
Next, find the desired Instance and click on the Create Snapshot button. This action initiates the process of backing up Instance data and may take some time to complete.
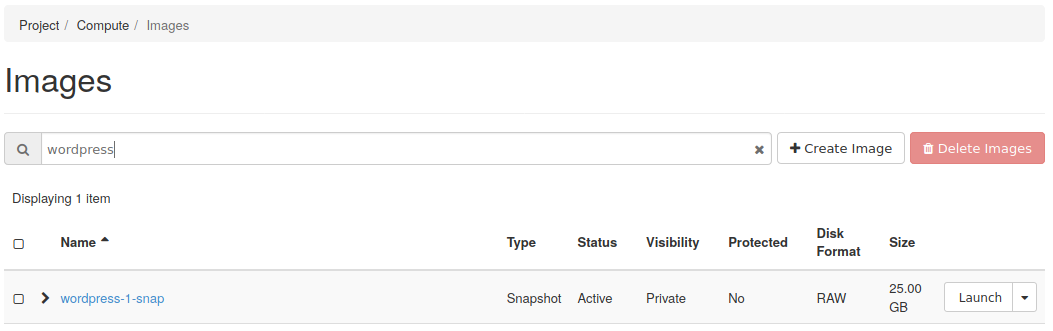
Step 2 – Confirming Backup Completion
To confirm that the Snapshot has been successfully created, go to Project -> Compute -> Images and then locate the Snapshot in the list.
Restoring a Virtual Machine Backup
How to restore a backup of an Instance?
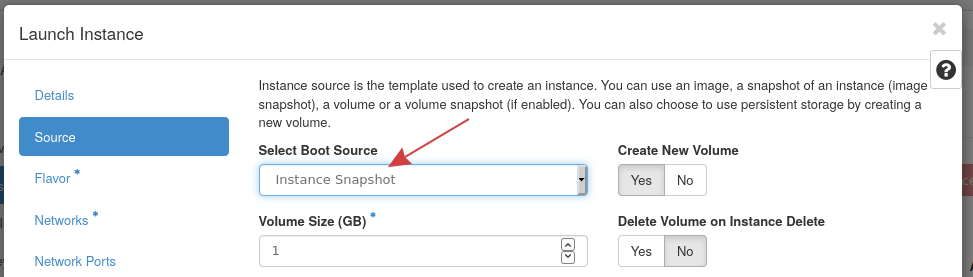
Step 1 – Restoring the Snapshot
To restore a Snapshot of an Instance, go to Project -> Compute -> Instances and launch a new Instance. When filling out the form, make sure to select the Snapshot as the boot source for the Instance and choose the Snapshot you want to restore.
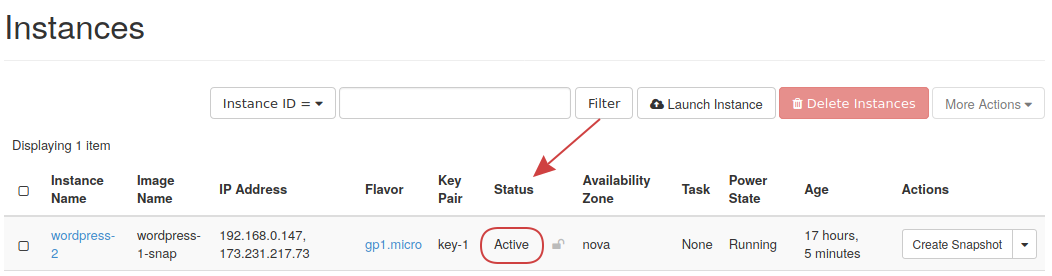
Step 2 – Confirming the Restoration
To confirm that the Snapshot has been successfully restored, list the Instances on the web dashboard and check the Status column. Ensure that everything is functioning correctly, and your desired Instances have been activated.
Backing up Volumes
How to create a backup of a Volume?
Step 1 – Create a Backup of a Volume
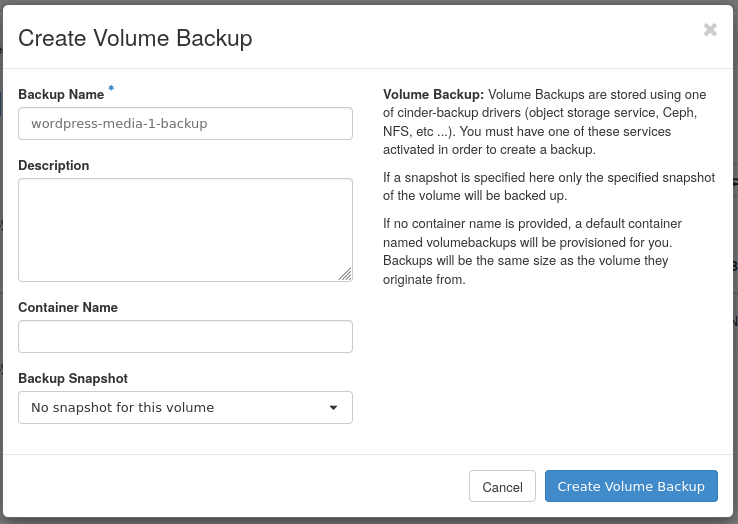
In addition to creating snapshots of virtual machines, you can use the dashboard to back up Volumes. This is particularly useful when working with a stable Volume and intending to create backups of it.
To back up a Volume, go to Project -> Volumes -> Volumes, then select the desired Volume. From the dropdown menu next to it on the right side, choose the option "Create Backup."

Step 2 -- Confirm Backup Creation from Volume
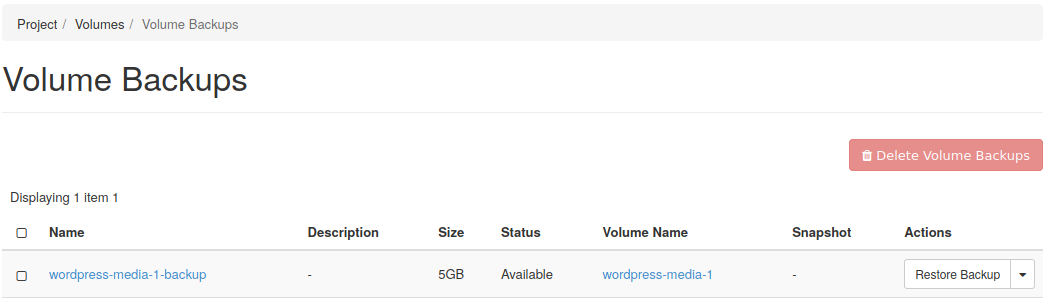
To confirm that the backup has been successfully created, go to Project -> Volumes -> Backups, then find the relevant backup in the list and pay attention to the Status column. You should see "Available," indicating that the backup is completed and ready for use.
Restoring Volume Backups
How to restore a Volume backup?
Step 1 -- Find the Volume Backup
To access the list of Volume backups, go to Project -> Volumes -> Backups and make sure that the backup you created is listed.

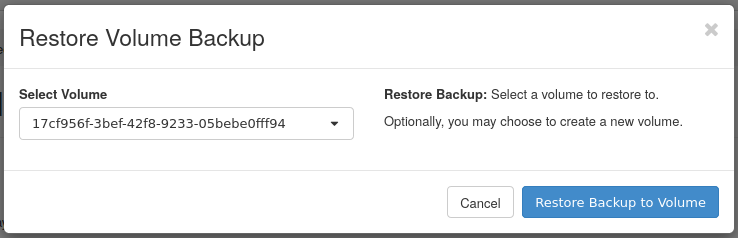
Step 2 -- Restoring the Volume Backup
To restore this backup, select "Restore Backup" from the dropdown menu next to the backup name on the right side.
Choose "Create a New Volume" to recover this backup into a new volume. Later, you can attach it to an instance.